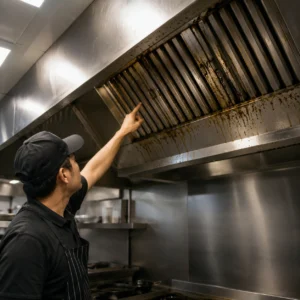
A greasy kitchen exhaust fan filter causes more damage than most homeowners realize. I saw this firsthand during a consultation at Frontline Cleaning Services, when a client kept complaining that her kitchen smelled like old cooking oil no matter how often she cleaned. Within minutes of checking her fan, I found the real problem the filter was so clogged with grease it couldn’t pull air out at all. Once we cleaned it, the smell was gone for good. That’s the pattern I see again and again: people clean their kitchen counters daily but forget the one part doing all the ventilation work. In this guide, based on real service calls across Dubai homes, I’ll show you how to clean your kitchen exhaust fan filter properly, step by step, so you avoid the odor, fire risk, and fan damage that come with neglecting it.
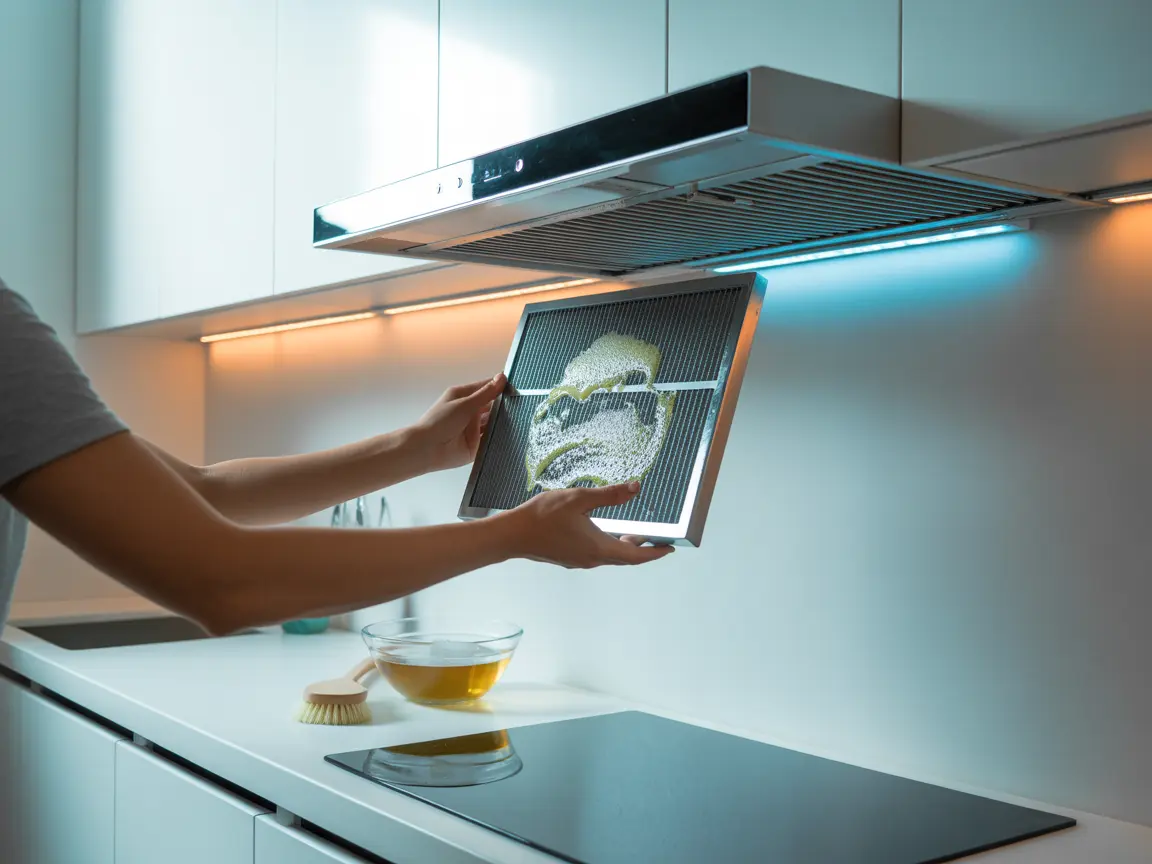
Quick Answer: To clean a kitchen exhaust fan filter, remove it, soak it in warm water with dishwashing liquid (or baking soda for heavy grease) for 15–20 minutes, scrub gently with a soft brush, rinse, dry completely, and reinstall. Clean every 3–4 weeks if you cook frequently.
How to Clean the Kitchen Exhaust Fan Filter: Step-by-Step
I follow this method every few months, and it has worked wonders for me. Here’s how you can do it too:
1. Remove the Filter Safely
- Turn off the exhaust fan and unplug it if possible.
- Carefully detach the filter according to your fan’s manual. Most filters slide or pop out easily.
- I sometimes consult professionals specializing in kitchen exhaust cleaning in Dubai to ensure everything is handled properly.
2. Soak the Filter
- Fill a basin or sink with warm water and a few drops of dishwashing liquid.
- For extra cleaning power, add 2 tablespoons of baking soda.
- Submerge the filter and let it soak for 15 to 20 minutes to loosen grease and grime.
3. Scrub Gently
- Using a soft brush or an old toothbrush, gently scrub the filter.
- Focus on areas with stubborn grease buildup.
- Avoid using abrasive brushes, as they can damage the filter mesh.
4. Rinse and Dry
- Rinse thoroughly under warm running water.
- Shake off excess water and dry completely with a microfiber cloth or let it air dry.
5. Reinstall the Filter
- Once completely dry, place the filter back into the exhaust fan.
- Turn on the fan to ensure it’s working properly.
Why Cleaning Your Kitchen Exhaust Fan Filter Matters
From my years of cooking and managing a busy kitchen, I’ve realized that a clogged filter can lead to poor ventilation, lingering smells, and even increased fire risks. Here’s why regular cleaning is crucial:
- Improves air quality: A clean filter ensures that smoke, grease, and odors are efficiently removed.
- Prevents fire hazards: Accumulated grease can be highly flammable if left unattended.
- Enhances fan efficiency: A well-maintained filter reduces strain on the motor, saving energy and money.
Neglecting this simple maintenance step can cost you both in repairs and health risks, so it’s worth the effort.
Tools and Materials You’ll Need
Before you start, gather a few items. From my own experience, having the right materials makes the process smoother and more effective:
- Warm water
- Dishwashing liquid or degreasing cleaner
- Baking soda (optional, for heavy grease)
- Soft brush or old toothbrush
- Microfiber cloth
- A large basin or sink
Tips for Maintaining a Cleaner Filter Longer
From my personal kitchen experience, regular care prevents buildup and saves time:
- Clean monthly: If you cook frequently, cleaning every 3 to 4 weeks keeps grease manageable.
- Use a degreaser: For heavy cooking, a specialized degreasing spray works wonders.
- Avoid dishwasher damage: Some filters may be dishwasher-safe, but hand cleaning is gentler and more effective.
- Wipe surrounding areas: Grease often accumulates around the fan casing, so clean it too.
Keep Your Kitchen Fresh Book Professional Exhaust Cleaning
Keeping your kitchen exhaust fan filter clean is a simple habit that protects your air quality, your fan’s lifespan, and your kitchen’s safety. But the filter is only part of the system — grease and odors often build up deep inside the ductwork where DIY cleaning can’t reach. In our years of servicing Dubai kitchens, we’ve seen how quickly a professional deep clean solves smells that home cleaning alone couldn’t fix. Understanding the Benefits of Regular Kitchen Exhaust Cleaning can also help you maintain a cleaner, safer, and more hygienic kitchen.
If your kitchen still smells after cleaning the filter, or it’s been a while since your last full service, book a free consultation with Frontline Cleaning Services and let our certified team handle the rest.
Frequently Asked Questions
How often should I clean my kitchen exhaust fan filter?
Clean your exhaust fan filter every 1-2 months depending on cooking frequency. Frequent cooking requires monthly cleaning. Light cooking users can extend to every 2 months. A greasy filter loses effectiveness immediately.
What’s the best way to clean a greasy exhaust fan filter?
Soak the filter in hot water mixed with degreaser for 15-20 minutes, then scrub gently with a soft brush. For stubborn grease, use baking soda paste or vinegar solution. Always let it dry completely before reinstalling.
Can I put my exhaust fan filter in the dishwasher?
Most metal filters are dishwasher-safe (check your manual first). However, hand washing with hot water and degreaser works better for heavily greased filters. The high heat of dishwashers can sometimes damage filter seals.
What happens if I don’t clean my exhaust fan filter?
A clogged filter reduces ventilation efficiency, causes kitchen odors, increases smoke and steam buildup, and forces your fan to work harder, shortening its lifespan. Replacement fans are expensive—regular cleaning prevents this.
Can I replace my exhaust fan filter instead of cleaning it?
Disposable filters need replacement every 1-3 months. Washable metal filters last years with proper cleaning. Check your filter type—washable filters are more cost-effective long-term.
What should I do if my exhaust fan still smells after cleaning the filter?
Odors may come from grease buildup inside the ductwork, not just the filter. Professional cleaning of ducts and filters may be needed. Lingering smells indicate deeper buildup requiring specialized equipment.